Hello sweet friends! I’m not sure about you all, but this time change has really done a number on me this year. I’ve been feeling super late the past few days. 🙂
I made this freezer paper stenciled shirt a few weeks ago, but the monkey got it dirty before I could get pics of it. 🙂
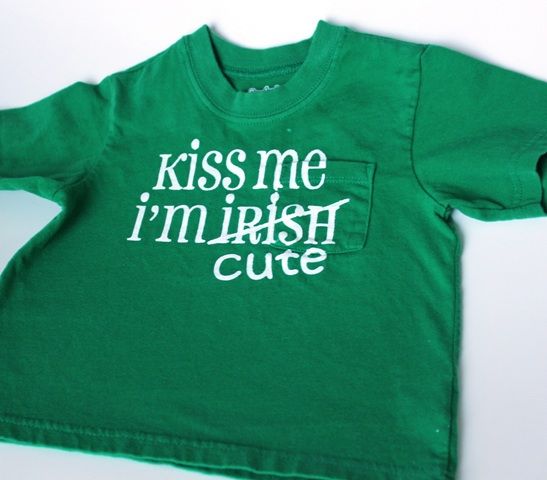
I wanted to make him a green t-shirt so he won’t be pinched on Thursday. 🙂 The only green shirt I found had a pocket on it, so I just pretended it wasn’t there. I cut the stencil with my Cricut, ironed it on, and painted it with white fabric paint.
Instructions for Making a Freezer Paper Stenciled Shirt
- Freezer paper
- T-shirt (green)
- Cricut cutting machine
- Iron
- White fabric paint
- Paintbrush
Prepare the Tulle
Begin by gathering your materials and preparing your workspace for the project.
Create the Volume
Adjust the volume of your fabric paint to ensure smooth application, if necessary.
Prepare the Poly Satin Circles
Cut the freezer paper into the desired shape for the stencil you plan to make.
Layer the Components
Iron the freezer paper stencil onto the t-shirt, ensuring it adheres well to avoid paint bleed.
Additional Personalization
Consider adding more shapes or designs to the stencil for a unique look.
Attach the Clip-On Earring
If you intend to add clip-on elements or accessorize, finalize those attachments now.
Prepare the Shoes
If you’re coordinating shoes, make sure they complement the finished shirt.
Make Additional Pairs
Encourage making more shirts for family or friends; share the fun!
Enjoy Your Custom Creation
Celebrate your creativity and enjoy wearing your unique shirt. Don’t forget to share your creation with others!
Conclusion
This project is all about fun, creativity, and expressing your personal style. Enjoy the process, and let your imagination run wild!